Wednesday, November 15, 2017

Reduce the appearance of your cellulite

Hello beauties! This week is a little different from what I been usually sharing. I know many girls do not like working out but in the meantime love to eat everything and anything. When summer comes around majority of us do not feel comfortable wearing swimsuits because of cellulite that are showing on our butt, legs, etc. These are the best tips you can follow in order to remove cellulite without any workout.


Step 1: Dry Brushing.

Many people do not know this, but dry brushing is an excellent way to reduce the appearance of cellulite. You must make sure that your skin is dry before starting.  Start from your feet and gently brush your skin from left to right side of your body. Make sure you brush your skin very gently. This should be done for about 5 minutes. I usually do this every day right before I shower. It is important to shower right after because you will want to wash away the dead skin cells. Dry Brushing works by helping to soften up dry skin. It also helps to tighten skin, renew cells, and help your blood flow. This brush can be purchased at Whole Foods for under $20.00.


Step 2:

This is personally one of my favorite cellulite remedies. I love this oil because not only does it work well for reducing the appearance of cellulite, but is also leaves your skin silky smooth! I love to use this oil when I go into the steam room. The steam and hot temperature of the steam room opens up your pores, and makes it even easier for your skin to absorb all the beneficial oils in the massage oil. I purchased this oil in Frankenmuth at a store called Those Nature People.


Step 3: Coconut Oil

Coconut oil has so many benefits, and I always make sure to have a jar in my pantry. There are so many uses when it comes to Coconut Oil, and one of them is cellulite reduction. After every shower, I place about a tablespoon in my hands and rub it all over my legs. Let it absorb into your skin before putting clothes on, because you do not want to get the oil on your clothes. I have been doing this for about a month now, and have seen a big improvement. My advice is to use it for as long as you want until you are happy with the results. This can be purchased at any grocery store; however, the best deal I have seen is at Costco for $20 for an 84 oz. jar.


Step 4:

Before I start my workouts at the gym, I put on my Brazilian Bum Bum Cream, and let it absorb into my skin for 10-15 minutes. This cream tightens your skin, and helps to reduce cellulite and stretch marks. This cream works similar to coconut oil, so you can switch the two products every day. The smell is amazing, and the cream is not as oily as coconut oil. This cream will help you achieve smooth skin and can be a substitute for body lotion. You can purchase this product at Sephora for $20. 


Step 5:

You can significantly reduce your cellulite with this easy trick. All you need is ¾ cups of coffee grinds, a cup of brown sugar, and a cup of coconut oil. You mix all three ingredients in a small bowl. You should do this in a tub, because it can be messy. Use the mixture and scrub it on areas of your body that you feel are affected by cellulite. This should be done in a circular motion for about 5 minutes. Once you are done, gently wash it off with warm water. You will feel a big difference in your skin right away. I would recommend moisturizing right after.

Wednesday, November 1, 2017

Teeth Whitening


Happy Monday everyone. Today my inspiration took me on a different level to what I have been sharing with you lately. Smile is so contagious and beautiful that is one of the first things we notice on the person. Teeth are very important to every look. Especially when the smile stands out with bright white look. I am going to share simple tricks that I do to whiten my teeth.

Step 1: Apple Cider Vinegar

There are few things that we keep in our kitchen such as Apple Cider Vinegar. One of the most beneficial things is a must have in the house. Not that many people are aware that its so good for teeth whitening. Take 1/2 tsp of apple cider vinegar with 1 cup of water and rise your mouth with this mixture every morning. Do this every day until you get the white color you prefer.


Step 2: Organic coconut oil

I have been oil pulling every single morning for the past 4 months and have been a huge difference. Not only do my teeth look whiter, but my mouth feels so clean. It is the first thing I do when I wake up. There are different oils you can use I personally prefer coconut oil. You start by scooping out one tablespoon of the coconut oil and swishing it in your mouth for 20 minutes. At first it might be very distasteful but you will get used to it the more you do it. You can also add lemon essential oil extra teeth whitening power. I also like to add the oil because it gives it a better taste. I put about 3 drops of essential oil on top of the coconut oil. Do not add too many drops of the essential oil on  top of the coconut oil. Do not add too many drops because it will give it a bitter taste if you put too much. During these 20 minutes I keep myself busy by cleaning or doing small chores around the house that I would have otherwise postponed. Make sure you do not spit the oil into your sink because it can clog your pipes. Instead spit it out in the garbage. I usually find an empty water bottle that I spit it into and throw it out. Rinse your mouth 3x after before brushing your teeth. I also recommend putting aside a different toothbrush that you use specifically for after oil pulling.

You can purchase coconut oil at any local grocery store. I purchased mine at Better Health for 12.99


Step 3:  Baking soda in the kitchen

Baking soda is not just for baking but also for whitening your teeth. Take 1/2 teaspoon of baking soda with a few drops of water to make a paste. Scoop the past up with your toothbrush and brush your teeth slowly for no longer than 2 minutes. Rise your mouth and the toothbrush. Do this every other day for next week to two weeks. You'll see major difference with your whitening. Click here for video guide BAKING SODA WHITE TEETH


Step 4: Magic Mud

Magic mud is one of my favorite teeth whitening methods because it is very gently on your teeth and causes no irritation. The results are comparable to that of Crest White Strips. This is the exact bottle I use that I purchased on Amazon. I must warn you though it can be very messy ! You do not want to wear any clothes you're afraid of staining because if you get magic mud on your clothes it is very hard to get it off. You start by wetting your tooth brush and dabbing it into the magic mud powder. You then brush your teeth for a few minutes and rinse out your mouth. Your whole mouth will be black while you are brushing it and it might look like you are missing teeth.

                                 
Step 5: Orange Essential oil

Orange essential oil is great for whitening your teeth. Its also very easy to use. I use this every time I brush my teeth. After you put toothpaste on your toothbrush put about 3-4 drops of this essential oil on top of the toothbrush and start brushing. I have noticed that it also gives me an extra fresh feeling after I brushed my teeth. This also can be purchased on Amazon or any health stores such as vitamin shop or whole foods. The price varies depending on where you buy it but its generally under $10 dollars.


Overall these are the things I use for my teeth whitening since I always get asked how often do I bleach my teeth honestly I don't. Start using these tricks and you'll see huge difference when you smile in person and in pictures.  Once you start doing it you'll be addicted to it and you wont leave your home until you do one the whitening's.

Sunday, October 22, 2017

Treat your skin right


Hello sunshine.  I am sitting on my patio this lovely morning and enjoying this 76-degree weather. I have decided to share my experience of  removing my acne and scars that has resulted in my face glowing and shining just like this sun. “Sleep, drink water and treat your skin.”


Believe it or not, sleep has a lot to do with how you look. Especially when you start hitting that age when you start going out, getting home late, and forgetting to wash your make up off or even refreshing your face after being out in public. Many germs are flying in the air that we are not aware  of, and we think because we haven't touched anything our hands are clean. Well that is not the case at all. You should always wash your face and hands no matter what. I am going to provide some of the tips that I have used and am still using today. Honestly I cannot live without these products.

Step 1: Face towel must-HAVE 
Your face towel needs to be separate from your hand and body towel. A lot of people use one towel for everything and they wonder why they are breaking out. The face is the most sensitive part on our body. It likes to be taken care of a little extra from the usual. Being gentle and providing more time taking care of your face lets you see the results when you look at yourself in the mirror. The picture below that I have provided you has two towels to give you a better idea of how to tell the difference of which one you should use. Always make one of them stand out from the other so it reminds you of what each towel is being used for. Example ( purple towel is for my face, black towel is for my hands).


Step 2 : Wash towels

Whether I have makeup on or not, these wet towels have to be in my cabinet. They are super fresh, smell nice, and they clean off everything that's on my face. I have tried many of them but these ones I have noticed work the best for my skin. To purchase these wet cloths for a super good deal, check your nearest, Kroger where I always get them for $4.99. They come in a package of 25 towels which lasts about three weeks or less depending on how often I wear makeup.


Step 3: 100% to be clean

No matter how much you wash your face, it's never enough.  This Clinique soap has been life changing for me. It's in a form of soap you put on your finger, slowly dab on your face, and massage until it becomes clear. After that, wash it off and dry your skin very good. You will be surprised at all the leftover makeup and dirt that the wet towels weren't able to take off that this soap does. This was purchased at Macys for $29.99.


Step 4: Moisture your face

A good moisturizer that works well on your face is a must have. I have tried a few different moisturizers, and this one seems to work the best for me. It prevents acne and helps maintain clear skin. This moisturizer gives me the complexion I have always wanted. This product can be purchased at Macys for $50. I use this product every single night after I wash my face.


Moisturizing my skin has changed the way my face looks. I prefer to switch up the products I use on a daily basis.  This skincare routine has given me really good results.

The mask pictured below is very easy to use. First you must unwrap the green package, then you grab the folded piece of mask slowly and peel it off. Then you place it on your face. My suggestion is to lay down with this mask so it doesn't drip and relax for 15 minutes. If you keep it on for a longer period of time, it  won't harm you, but it will start coming off. Do not wash your face, just take clean dry towel and slowly tap it on your face and let it dry. The Dry mask can be thrown in garbage since it is only for one use. This mask has been purchased at Sephora for $6 and the only mask I recommend replacing Clinique moisturizer.


Step 5: Dealing with zits

As assuming we are done with zits there they are back on our face. Yes back in the day when Proactive was super popular that's all I knew about and used to get them away. Honestly up to this day when I have a few zits that will not go away proactive lotion is the only thing that has helped. Do not put too much on, just on the places where you are breaking out. This should be applied right before bed, and kept on the face overnight. This can be purchased on their site www.proactive.com and I usually buy the package this comes in three for only $19.99


If you are dealing with bad acne that not even cover up can cover, this is a life saver that you should use before applying any make up. My recommendation is to put it on 6 hours before the event. You can also put this on before going to bed once you wash your face. Do not put it on acne that is open, this is just going to burn your skin and you don't want that. Only use it for redness so it dries out the pimple. Do not shake the bottle. Dip a Qtip in it and slowly apply it on the zit. It's going to be cold at first but it will start being numb and slowly dry. After that there is no set time of how long you have to keep it on, whenever you are ready you can wash your face. This product was purchased at Nordstrom for $18.99


Step 6: Change is good

Products that I love to use throughout the week are the ones that provide my skin the oil and vitamins my face needs. Tarte Maracuja oil is beyond amazing. It gives you that glow, but also protects you from breaking out. Very useful after wearing makeup during the week to put it on and just let it dry. Take only two drops and rub it all over your face. Don't put too much on. Remember that no matter what kind of skin you have it has its own oil so adding more oil from what it needs could break the skin. This product was purchased at Sephora for $48.00.


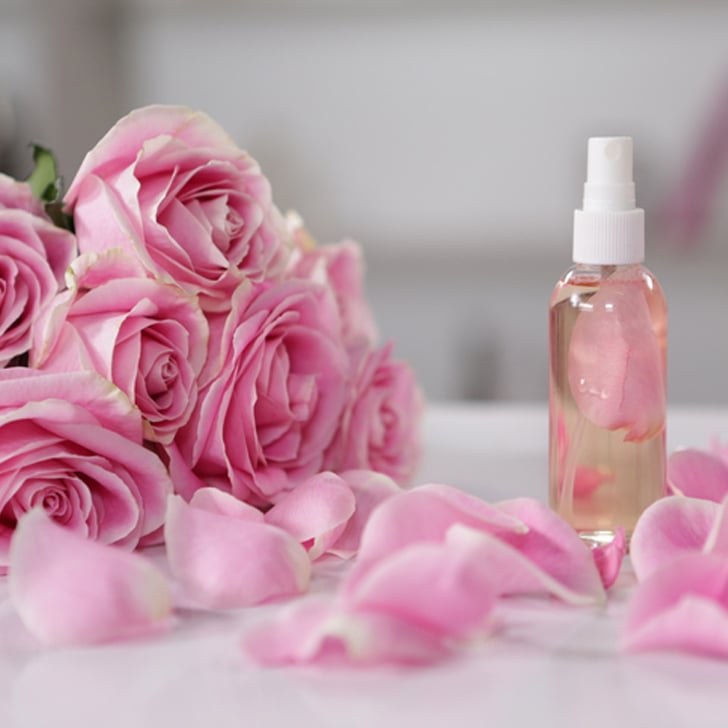
Step 7: Natural glow

Rose water is something I love to use. I use this product once a week. Some people use it every single night but since I am already using other things I feel that once a week is pretty good. After you wash your face spray it with rose water, moisturizer doesn't go after just let the rose water soak into your face.

Image result for rose water spray

Step 8 : Main product do not skip

After following all these steps it is super important to make sure you don't skip this last one.  Nobody wants to look old, looking young is the best medicine ever. How to keep that up I been using "renewed hope jar" for past year and I am beyond happy with results.  This is something I like to use three times a week instead of only being stuck on moisturizers this also helps me with aging and wrinkles. White jar is for during the day that I put all over my face after the nice wash and black on is for night. Very satisfy with results. These two items I have purchased from Macys for both $75.


Hopefully these products will be in your cabinets tomorrow. If you wanna look good you got to spend money and effort. Don't believe them when they tell you "looks don't matter" they sure do.


Monday, October 16, 2017

DIY facial mask


Happy Monday, beauties. Today I was inspired to write a quick post for Monday- a self-love focused post. Monday might be your new Sunday for facials and big cup of coffee. "Every accomplishment begins with decision you try"

Step 1: Mondays are not that bad, pour yourself a big cup of coffee

I started my morning with a big cup of coffee. I knew I wanted to share important products that everyone should know about when it comes to their face. As we are keeping up with our New Year's resolution, our goal is to be better from last year, since this year is almost at the end it’s never too late to start that change NOW. The face is the first thing we notice when we look at someone and this is why so many people strive for clear skin. The natural look never goes out of style.

Step 2: Facial Monday fun day with my friend Petra

I love the fact that Petra and I have same outlook when it comes to our skin. We strive for healthy, young, clear looking skin at the same time avoiding harsh chemical products and aiming towards natural organic products. Petra and I have normal type skin but these products work for all skin type. This particular facial is aimed at preventing wrinkles, acne, and clogged pores.


Step 3: Let the fun begin with washing our face

First and foremost, make sure your hands are clean before you being your facial. You do not want to touch your face with dirty hands. Your face is one of the most sensitive part of your body. Before beginning facial make sure, you remove your entire make up. Once you have removed the entire make up from your face start by washing your face with the TruSelf cleanser face wash. This face wash is made out of tea tree oil, which has antiseptic properties.


Step 4: Facial Steaming  

This part is so exciting! To start off make sure your face is wet, take the facial scrub with your finger and put it all over your face as if you are putting lotion on. Massage into your skin in circular motion to exfoliate the dead skin off. If your skin appears red do not worry that is normal. You will have to massage this for 2-3 minutes and slowly wash it off with warm water. This facial scrub is amazing. It is very gentle and leaves your skin smooth and beautiful; I would recommend for this to be done 3 times a week.


Ingredients:  Mel (Honey), Jojoba Esters (Jojoba Beads), Organic Prunus Serotina Extract (Cherry Concentrate)*, Sodium Ascorbate (Vitamin C), Tocopherol (Vitamin E), Extracts of Fragaria Vesca Fruit (Strawberry), Rubus Fruticosus Fruit (Blackberry), Citrus Grandis (Grapefruit) Seed, Vaccinium Angustifolium Fruit (Blueberry), Organic Rubus Idaeus Fruit (Raspberry)*, Vaccinium Macrocarpon Fruit (Cranberry) and Punica Granatum (Pomegranate) * Certified Organic


Once you wash your face, you will dry your face with a towel and place your face on the steamer. Facial steaming is so relaxing. It works by releasing steam and opening up your pores. This machine was purchased at TJ Maxx for $19.99. It can also be purchased on Amazon or Bed Bath Beyond. If you do not want to spend money on buying the machine a cheaper way to go is boiling a pot of water and placing your face above it ( warning : DO NOT get to close it might be too hot).

Step 5: Clay mask

You will need 2-3 teaspoons of clay. Mix the clay inside a small bowl with apple cider vinegar.
The best clay I would recommend to anyone is the TruSelf Detoxifying. You want to make sure you do not put too much on your face because it will take longer to dry. The color of the clay on your face will be dark green but as it dries, it will appear lighter and it will develop into crumbs. When you notice that is completely dry that is when you will know it is time to wash it off with warm water.
                                                                     

Benefits of Detoxifying Mask are unreal. After you realize what this mask does to your face you will be hooked to this product and use it all the time. The most popular skin concern that people have are acne, clogged pores, wrinkles and this particular facial is beneficial for all three problems.

Step 6: Essential Oils

When your face is completely dry and clean, pick one of the three essential oils put a few drops on your finger and lightly tap it wherever you have a pimple or zit. This will dry them out and they should reduce in appearance the next day.


Overall, I would recommend everyone to try these facials. This is for you and you should never be lazy to do things for yourself. Boost that confidence level "selfie with no filter".

Reduce the appearance of your cellulite

Hello beauties! This week is a little different from what I been usually sharing. I know many girls do not like working out but in the me...